Monthly Archives: February 2013

Up and Down and Round and Round

Pump_Drill

There are times in-between the major projects that I do small side projects just to see if I can get something cool to work.  One of my interests is primitive fire starting techniques.  There is some good overlap with this interest and my traditional woodworking.  Well, a Pump Drill is definitely a project that has both aspects.  It can be used as a drill or a fire starting tool.

First the fire starting.  It is not certain if the Iroquois invented this for fire starting or were culturally contaminated by seeing the pump drill used by the settlers from the Old World.  Either way, it is a very effective fire starter if built right.  I have not used mine for lighting fires yet, as I have not built a proper chuck to house either a drill bit or a piece of fire drill stick.  If you are interested in the fire starting aspects of this tool I am providing below a few links that will give you more information.

Primitive Pump Drill fire starter

Field and Stream Pump Fire Drill

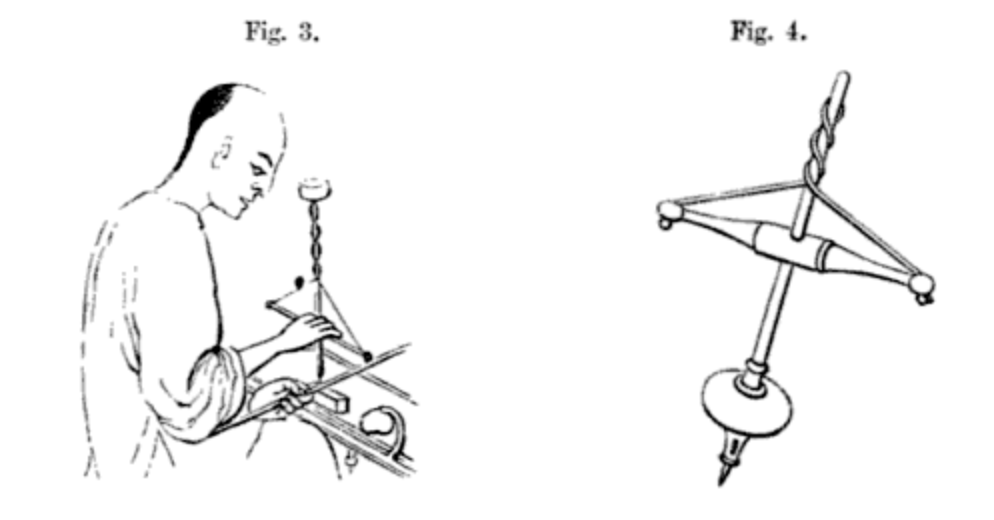
As this is a woodworking blog, I will concentrate on the boring aspects of this tool.  There is really very little information on when this tools was invented, but it is known to have been used as far back as middle ages and evolved from the bow drill.

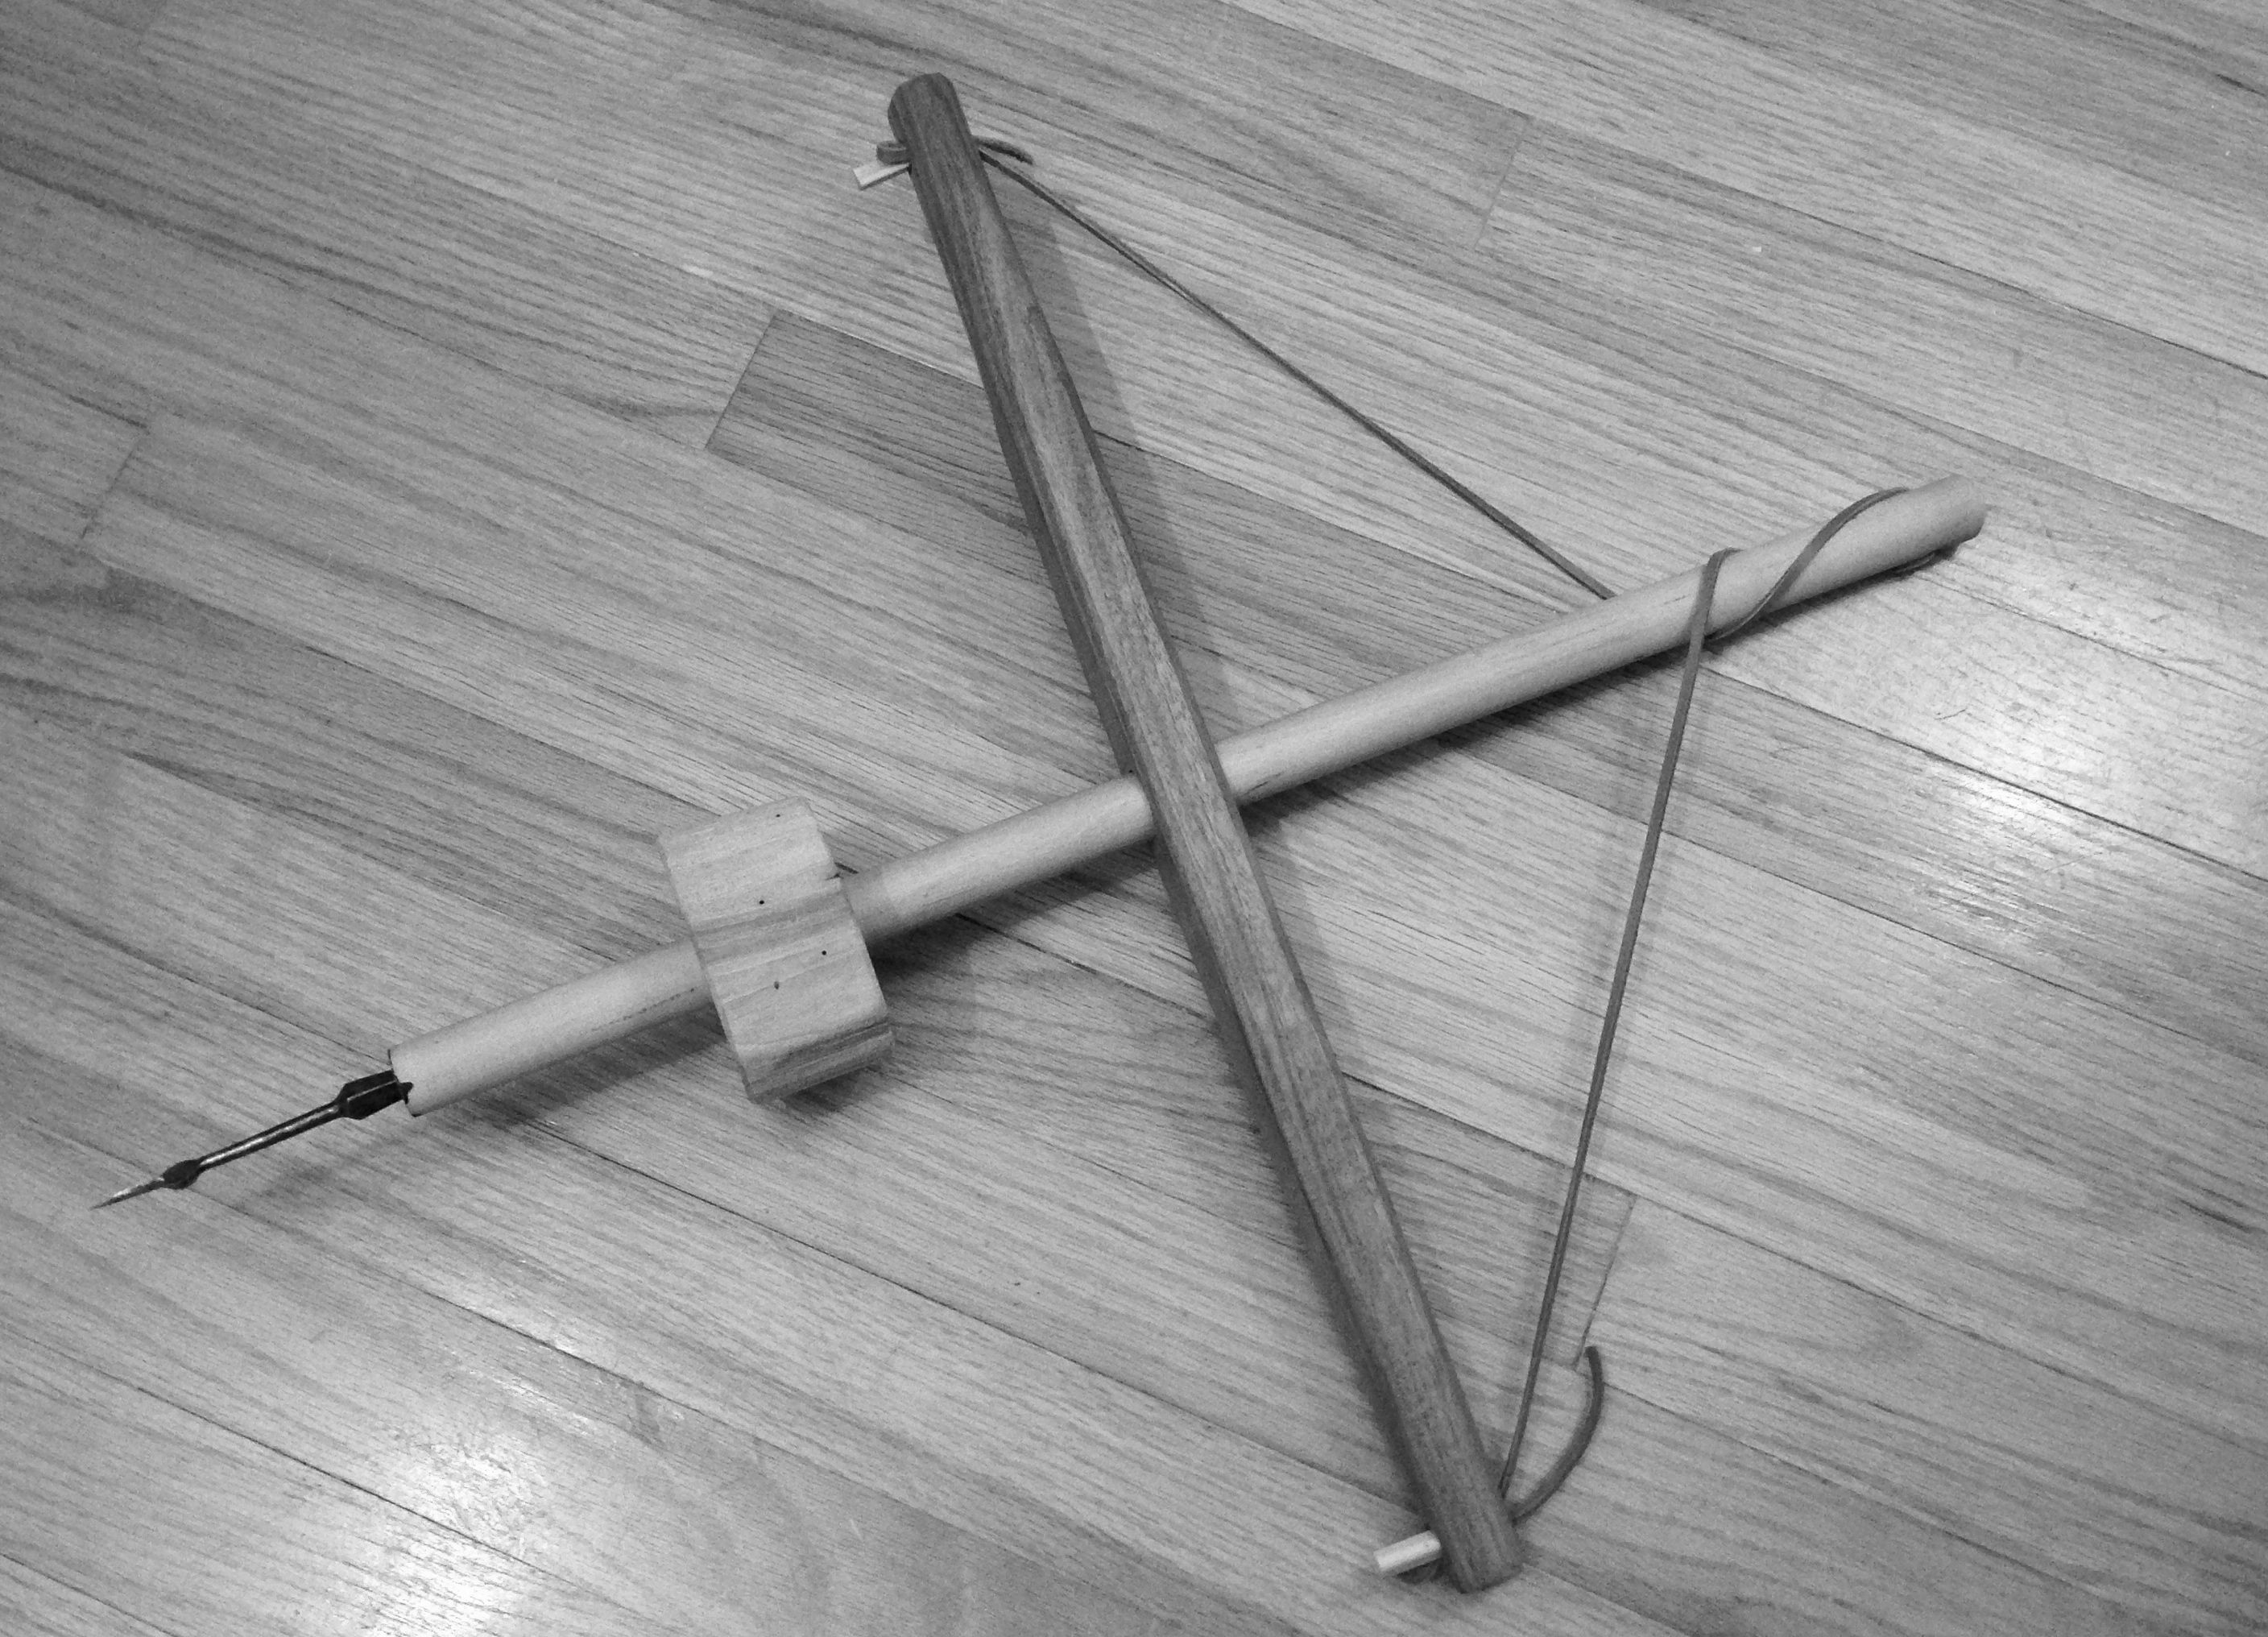
I have seen this drill used in a few videos and decided to make one of my own.  I had the basic components on hand a 7/8″ dowel, a nice heavy piece of hickory, a scrap of walnut and some leather thong strapping from my recent leather work.

pump_drill2

Construction

1) Make the flywheel from the hickory.  This took the most time.  As my lathe is not built yet, I had to resort to, shall we say, more crude techniques for making a round disk out of a really, really hard piece of wood.  I made the disk about 1 1/2″ thick and 3″ in diameter.  I could have made it a bit wider, but a too large flywheel will block your view of what you are drilling.  I then drilled a 7/8″ hole in the center as true to 90 deg. as I could.

2) Make the shaft.  Well I already had the dowel and so I just cut it to length at about 18″ and put it through the hole in the flywheel about 4″ from the bottom tip.  I drilled a 1/4″ hole thru the flywheel into the shaft and drove a 1/4 dowel in to secure the flywheel (no glue needed). Then drill a 1/4″ hole in the top end of the shaft for the strapping.  I also, very carefully, drilled a 1/4″ hole in center of the tip of shaft.

3) Make the pump stick.  Drill a 7/8″ hole in the center of my walnut scrap that was about 18″X2″X7/8″.  Then drill a 1/4″ hole for the strapping in each end about 3/4″ from the ends.  To finish I tapered the ends on the shaving horse with my draw knife and spokeshave and beveled the sharp edges with my new LN block plane.

Assembly

This could not be easier, I added some bees wax to the shaft where the pump stick would be sliding up and down.  Then slide the pump stick on the shaft and then attach the leather strapping thru the hole in the tip and secure with a small wedge.  Next pass the strap through the top hole in the shaft and then back to the other end of the pump stick and secure in the same manner as the other side.  You should adjust the pump stick to hang about 1″ – 1 1/2″ from touching the flywheel.

IMG_0724

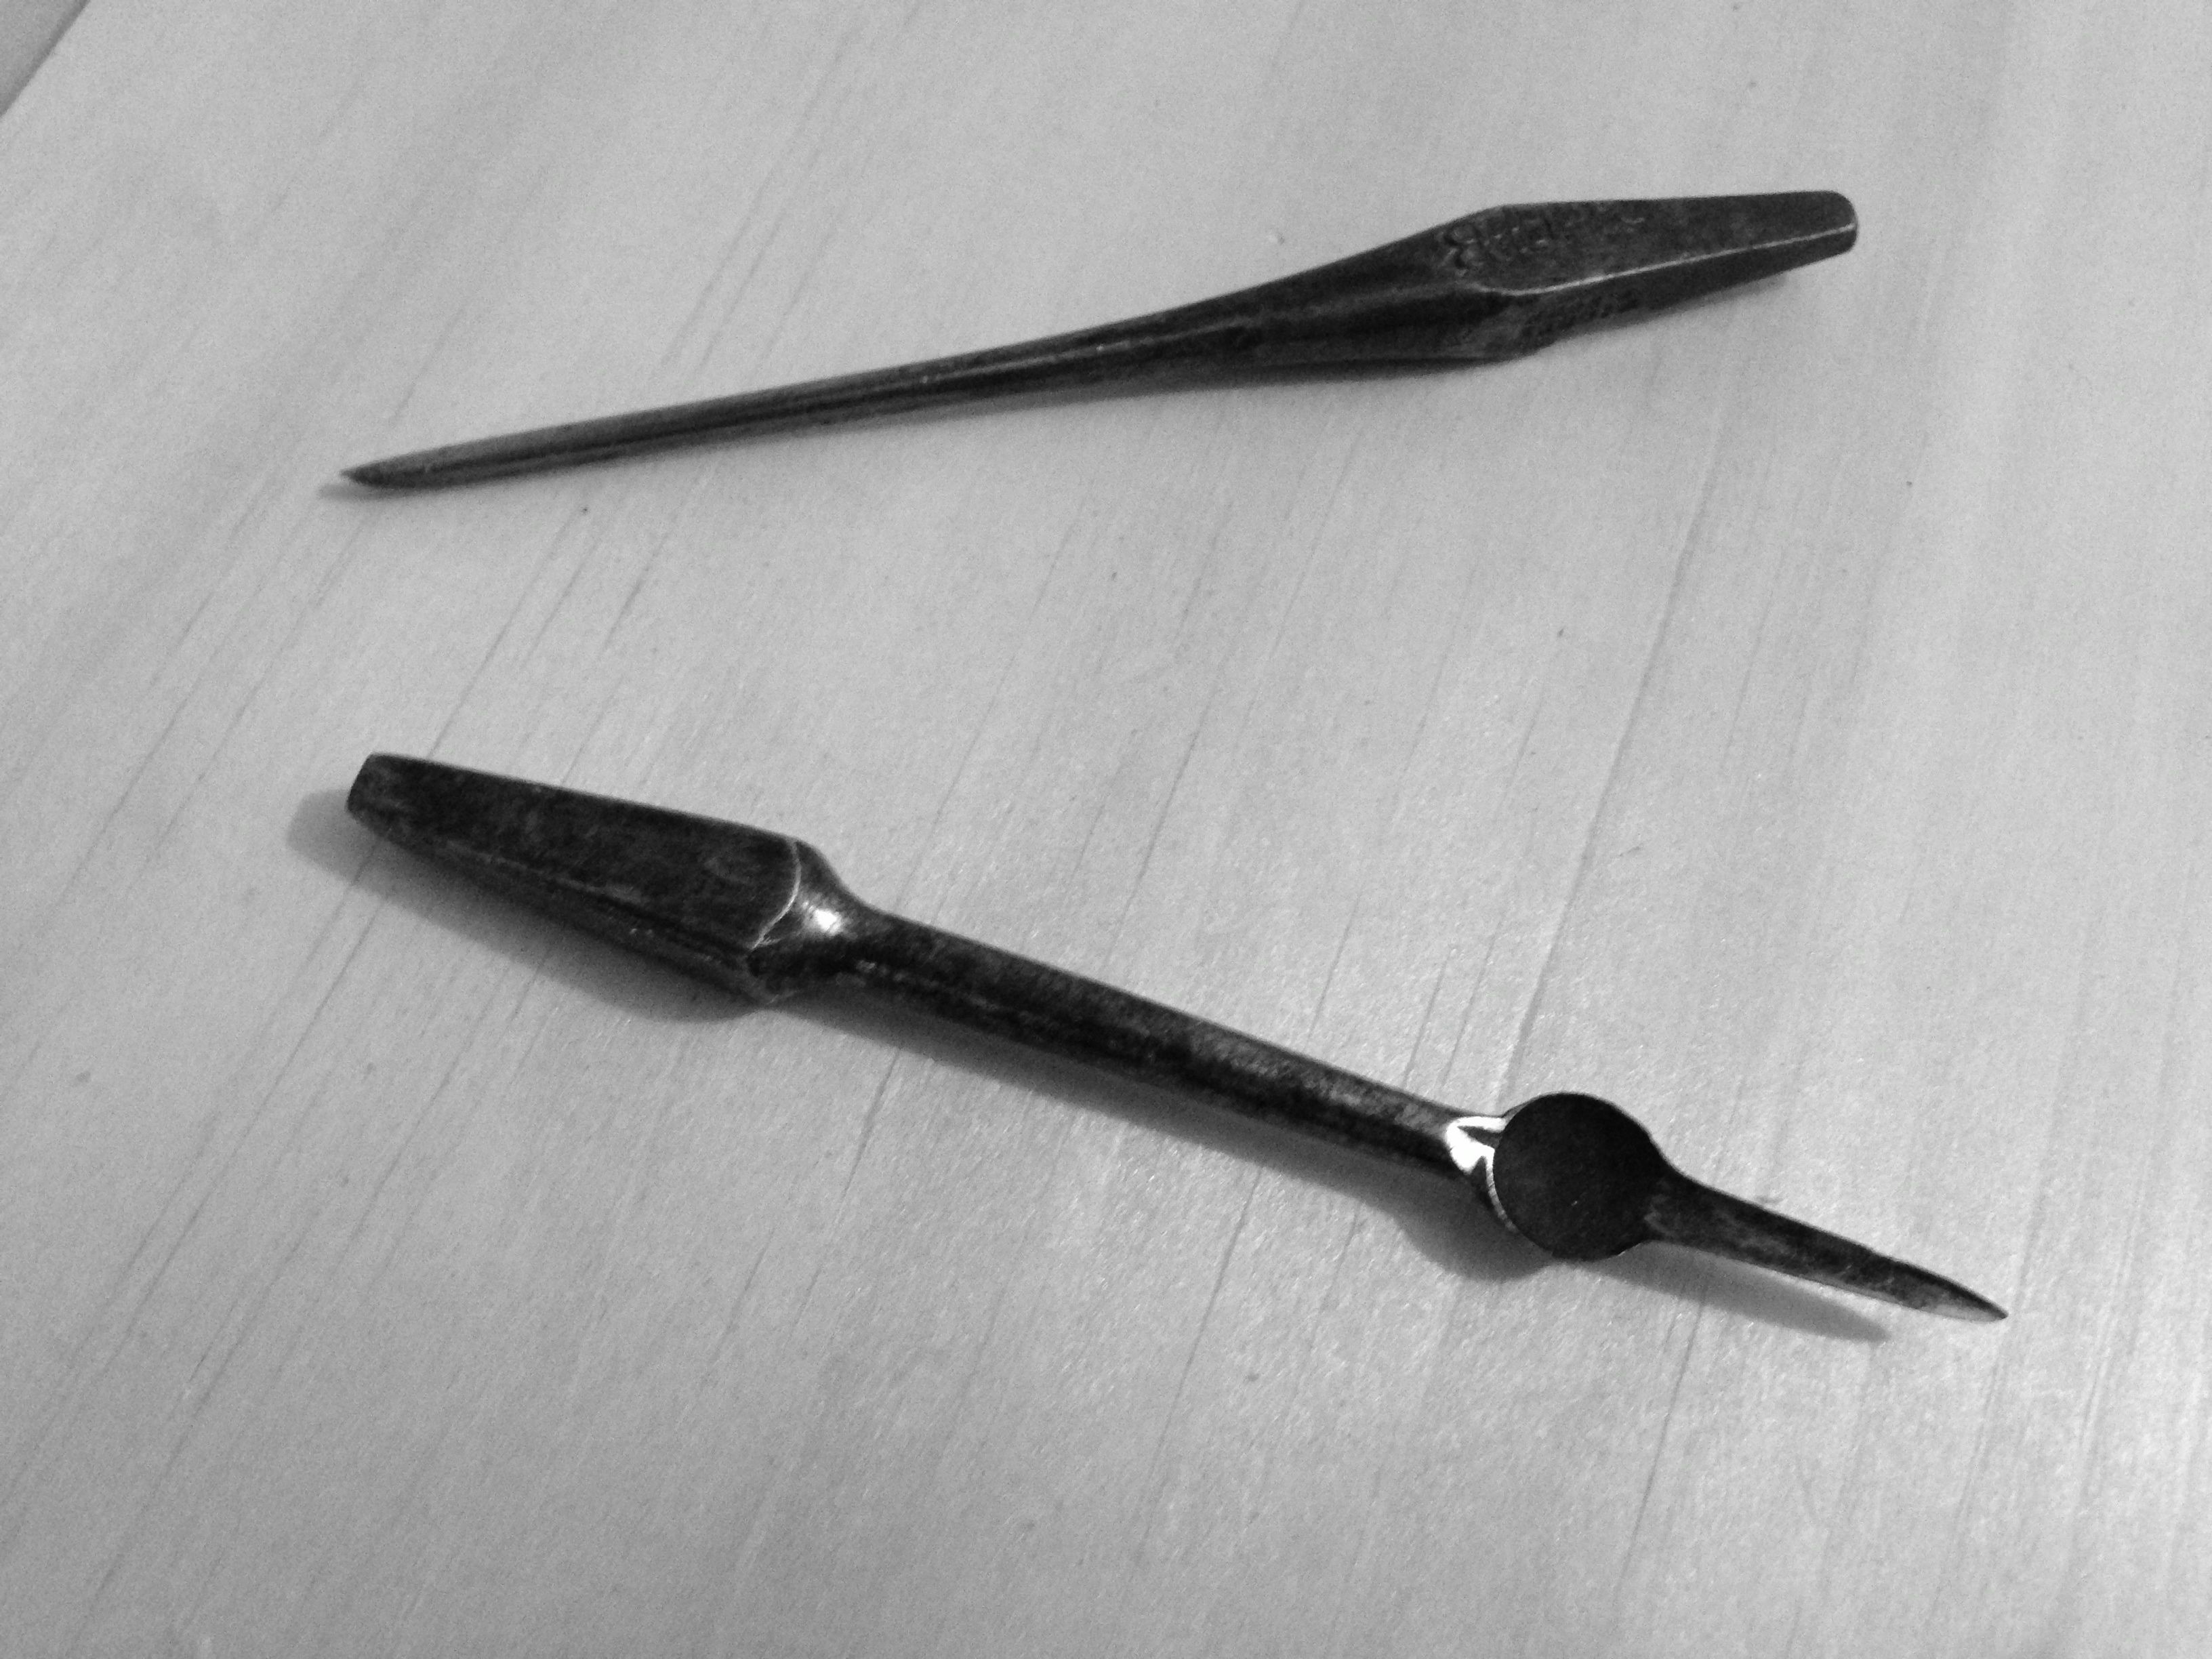
In the video below, you will see that for demonstration purposes, I added one of my spring pole lathe centers to the tip on the shaft so that it would spin when I pumped it.  I did make a trip to ED Lebetkin’s awesome tool store and purchased two drill “spoon” type bits that work really well in these types of drills.  Ordinary twist bits will only cut on half of the strokes and are not very efficient.  These spoon bits cut on every stroke as they have a cutting edge on each side.

Next Steps: Make a chuck for the square tapered bits and one for the fire starting too.

One final note; once my lathe is finished, I want to make a really nice version of this drill with a polished stone flywheel and turned components in a couple of different sizes.

-Aaron


Got me some SYP

As I mentioned in my first entry for the Spring Pole Lathe, I will be making regular updates on my progress for this project.  We had company this weekend and I had the pleasure to share some shop time with my new friend who’s name is also Aaron.  We had a blast and I hope he had as much fun as I did.  After our guests continued on their vacation, I decided to go to my favorite lumber store, Capital City Lumber, and purchase the southern yellow pine, or “SYP,” for this project.  Much to my dismay, they do not carry dimensional SYP.  I could not believe it, then I remembered I bought some SYP at my local Home Depot for our raised bed garden last year.  Armed with this information I headed straight for the nearest Home Depot.

If you have never purchased or worked with SYP, then let me tell you, it is heavy stuff!  I remember the 2x10x12s I bought last year were really heavy.  This time I was buying 2x12x12s and they are almost too heavy for me.  I had a lot of difficulty choosing boards because they were so heavy and the selection was less than desirable.  I settled on two boards and used the cut list I had prepared to have them cut the boards to a more manageable size.  I loaded up the boards and headed home.

Once home, I had some additional cutting to do on the table saw.  I know, I know what you are saying:  “You used a power tool?”  But 24+ feet of ripping 2x stock is not what I consider fun.  Please remember even the olde timers had access to sawmills and were able to buy pre-dressed stock.  This is just a modern sawmill.

After I had rough cut all my stock to length and width, I created a lettered parts list and a cut diagram from the drawings.  Next it was time to surface plane.  When I said that this lumber was less than desirable I mean, among other things this lumber was dirty.  I do not have a thickness planer so I hand-surfaced the stock with a non-valuable junk plane so as to protect the sharp blades of my good planes.  As you can imagine, we are taking about 10s of linear feet here so this will take me a while to finish.  This is just as well as this stock is a little wet.  Once planed, the stock looks really nice, see the before and after pics below.

Clean on the left and needs work on the right

One other thing, I purchased two “Gramercy Hold Fasts” from “Tools For Working Wood” on Friday and they were delivered on Monday.  A hold fast is a clamping device used on a bench in predrilled holes and is very convenient for holding stock while chieseling, sawing, and chopping mortises to name a few.  I added small pieces of leather to the flat ends to help keep from marring my work pieces.  Here is a picture of the hold fast in and out of the bench hole.

One interesting factoid about these is they work better in thicker benches (The manufacturer suggests a minimum of 2″) and not so much in thinner benches.  My bench is very thin, it is 3/4″ and only have one hole bored that is about 5″ deep.  I had figured that the 5″ inch hole would work best and the thinner ones would be useless.  As it turned out the thinner ones work best.  I think the 5″ hole may actually be too deep.  I do not want to use them too much on the thinner holes as the hold fasts will probably damage them.  I will add a piece of leftover oak flooring to the back of my bench to give the holes more thickness, making them stronger and less likely to be damaged.

When I complete the workbench class this spring, I will finally have a bench made for traditional woodworking and the hold fasts will have a nice place to play.

Stay tuned for more, later, on the SYP and spring pole lathe.

-Aaron

First Step

André Roubo's illustration of a Spring Pole Lathe

You know the saying:  “Every journey begins with the first step,” well this is true for my woodworking projects as well.  Last month I attended the MWTCA tool meet in Hillsborough, NC and I purchased a old loom shuttle for $5.00.  If you are not familiar with loom shuttles, they are used to pass the horizontal thread through the vertical threads and they have steel cone shaped points in each end.  It is these points that I am interested in as centers for my upcoming project – a Spring Pole Lathe.  These points make excellent dead centers as they are perfectly round and smooth.  I did not mind destroying this particular shuttle because it was made out of some sort a laminate and was not very old.  I would have had a much harder time bringing my self to destroy a wooden antique, even for a good purpose.  One other plus, I was able to re-purpose the spool in the shuttle as a leather burnisher.  It works great for this task.

What is a “Spring Pole Lathe” you might ask.  A lathe is a machine used to turn round objects like spools, spindles, bowls and tool handles.  A Spring Pole Lathe is a more traditional type of lathe that has been around for 1000’s of years.  This is a reciprocal, driven by a cord wrapped around the piece being turned, and only cuts on the down-stroke of the foot treadle.  There is more information at the end of this article about this amazing tool.

Back to the shuttle points.  Well, saying that they were smooth is stretching it a little; they had a very light coat of rust.  Fortunately, they have a nice 3/8″ shaft and mount in a drill chuck perfectly.  A few minutes with course to finer sandpaper and they will have a nice smooth finish.  I hope to provide each step in the lathe building process in as much detail as possible to show how this is built.

I will be using Roy Underhill’s plans for a breakdown model for easier transport.  I have been planning to build this for some time and I have just finished a lengthy house project and I have promised myself that the lathe is my next major woodworking project.  I know Roy is tired of me asking tons of questions about the design.  I just want to have a usable tool that I will get many years usage out of.

Here is the online information and some pictures of the lathe.  The Woodwright’s School has a class on making the lathe Making the German Spring Pole Lathe with Roy Underhill.   I have enough experience now that I should be able to make this myself without the class.

Here is a link to the Wood Turners of Virginia’s web site. This is the plan I will be using to make my lathe.

Here is a link to a Lee-Valley article about spring pole lathes and some of their history: http://www.leevalley.com/us/newsletters/Woodworking/5/5/article2.htm

The Woodwright’s Shop featured the spring pole on a couple of episodes, but the one I am making was shown on Season 24 episode 5.  Unfortunately that episode is not currently available online.

My son Will with Roy being Roy

The picture on the left is Roy, who was helping my daughter, Malena, with her turning.  This was taken in Jan. 2012 during the Lie-Neilson tool event at the NCSU Crafts center. The picture on the right is my son, Will, and Roy being Roy at the Jan. 2013 Lie-Neilson tool event at the NCSU Crafts center.  Kids change but Roy stays the same.

The wood that I plan on using is strong, hard, cheap and plentiful SYP, or Southern Yellow Pine.  This stuff is heavy and strong.  It is a good choice for this lathe, and it available most anywhere in my area.  I will be getting my supply from Capital City Lumber, local in Raleigh.

I cannot wait to get started and I hope you will join me in this fun, and useful project.

-Aaron

“Keep those Olde Tools sharp”

It’s Not all about wood over here

As woodworking is my main hobby, obsession, meditation etc., I do not usually venture in other crafts … usually.  But I have recently been contemplating a journey into the wild and wonderful world of leather work.  This is mainly a desire to make items for my tools such as sheaths and various means to protect my tool’s sharp edges from each other and my skin.

I have several cases and sheathes I have purchased or inherited and I still have several items that need to be protected.  I have some Axes, adz’ and drawknives in dire need.

This was all pretty back burner stuff until I saw this article on “The Art Of Manliness” website.  This is a great site for all men, young and old who want to get in touch with their inner manly self.  The article describes how to build a wallet that will last the rest of your life.  Not the flimsy crap you buy in a store that look great until you put stuff in it and actually use it.  I knew I could make this wallet.  It had a template and great instructions.

I do have some limited experience with working leather.  Growing up, my neighbor was a multitalented and incredibly smart man.  One of his hobbies was leather working.  He made his own trick roping saddle which was beautiful and very functional.  He graciously and patiently taught me to do basic stuff like tooling and dyeing.  I made a belt with my name on it (i’m sure I wore this belt out).  This was a very fond memory because he took the time to help a curious and eager youngster learn to craft leather.  He is gone now but definitely not forgotten.  His attention to detail and drive for excellence have influenced me ever since.

After deciding to make the wallet, I went over to my local Tandy Leather Factory and purchased some leather and other supplies to do the job.  First off, at Tandy you cannot buy just 1’x 2′ piece of leather.  They offer large pieces, scraps or kits.  I chose scraps as they had some 3-4 oz. scraps big enough for this project.  With supplies in hand I went home and started working.

The first thing I had to do was to print out the pattern in the correct scale.  The plans say you can print it full size on 11×17 , I suggest you have it printed at a place like Kinko’s if you want to make one.  I finally printed the plan in 4 sheets and taped them together.  I then cut out the individual pieces and used them as the cutting guides for the parts.  I actually used pushpins (in the hole locations on the corners) to attach the plan and leather to a board and then used a steel rule to cut them out.  Also I had a old leather awe I bought, mistaking it for a bird cage awe, and it worked great in puncturing holes for the stitches.

After completing this project, I decided I can do leather work and that I actually enjoy it quite a bit.  I love hand stitching!  Who knew?  In the vein of my original intent to make woodworking add-ons I made the small tool sheath for my Veritas Plow plane blades seen above.  This was from the scraps I had left over from my wallet project.  Now my blades do not have to hang out in the disgusting duct tape holder they were in, yuck!

I have since purchased some more tools and supplies and some more leather.  I decided it would not do to have my new leather craft tools knocking around in a box, so I hastily added a tool rack to my repurposed Clementine box and the picture below shows the result.  This is a temporary solution, but so far it is proving quite convenient.  I see a new woodworking shop project in my future, after I build my spring pole lathe of course.

-Aaron