Good Wood

New "used" flooring


I just bought some recycled white oak flooring for my workshop.  It is solid 3/4″ x 2 1/2″ from our local Habitat for Humanity store here in Raleigh.  I paid $1.50 / square foot,  this is very straight grain premium grade flooring on the cheap.  Best of all, no additional trees were cut to give me a comfortable and beautiful floor.  I plan on sanding the old finish off, putting a light stain and then applying a single coat of poly to raise the grain to make the floor a bit less slippery.  This treatment is like the one Chris Schwarz mentions in his ATC book regarding his shop floor.

You’ll also notice the carriage lantern in the picture.  This has great patina and will give my Olde Tool Workshop a more vintage feel. My only concern with this fixture is the amount of light that it will give off because it will limit its usefulness after I loose my natural light.  As a remedy, I can always add supplemental lighting later if needed.

So far I am on track for getting this shop finished.   I will be laying the sub-floor tomorrow and letting the oak flooring acclimate to the space all next week.

– Aaron Henderson

A Clean Slate

I finally emptied my old office this weekend.  This is the space for my new “traditional” workshop.  Now that it is cleared out, I am on schedule for painting the walls and installing the new flooring.  If I can find a deal on some nice maple flooring, I will use that, otherwise oak is my second choice.

My next steps are:

  1. Rip out old carpet and padding
  2. Paint
  3. Prep concrete for subfloor
  4. Install vapor barrier
  5. Install subfloor (Hopefully to be completed by the end memorial day weekend)
  6. Purchase flooring
  7. After a week of acclimating, install flooring
  8. Finish floor
  9. Move in

I know this is not really a woodworking project per se, but it will allow me to be more productive and by being in the house, more inviting.  I know my cat will like it.  He loves to roll in wood shavings and then track them all through the house.  My wife does not like this, but we tolerate it, as it is a small price to pay to have a happy cat.

My next project after getting my shop situated will be to make a “proper” workbench.  This, of course, will be chronicled here for your amusement.

– Aaron Henderson

The Finish

atc_chest_sm-01

Well I’ve done it; I’ve gone and finished another project!  This has been a pretty long project but I am really pleased with the results.

Background:

Over the winter holiday break I decided to get off my very-rested posterior to make an Anarchist Tool Chest or ATC (see Chris Schwarz ) of my very own.  This would mean making a LOT of dovetail joints.  My dovetail experience up to that point had been confined to Roy’s one-day dovetail class at the Woodwright’s School (which was great) and a couple of practice pieces that I had done on my own. My trial attempts were pretty pathetic, but at the dovetail class I had a hand-tool epiphany: Sharp tools make all the difference in the world!  I know this is a simple concept, but until you have experienced the joy that is using a good, sharp chisel, you have not lived….or at least probably not been successful at dovetail joints.

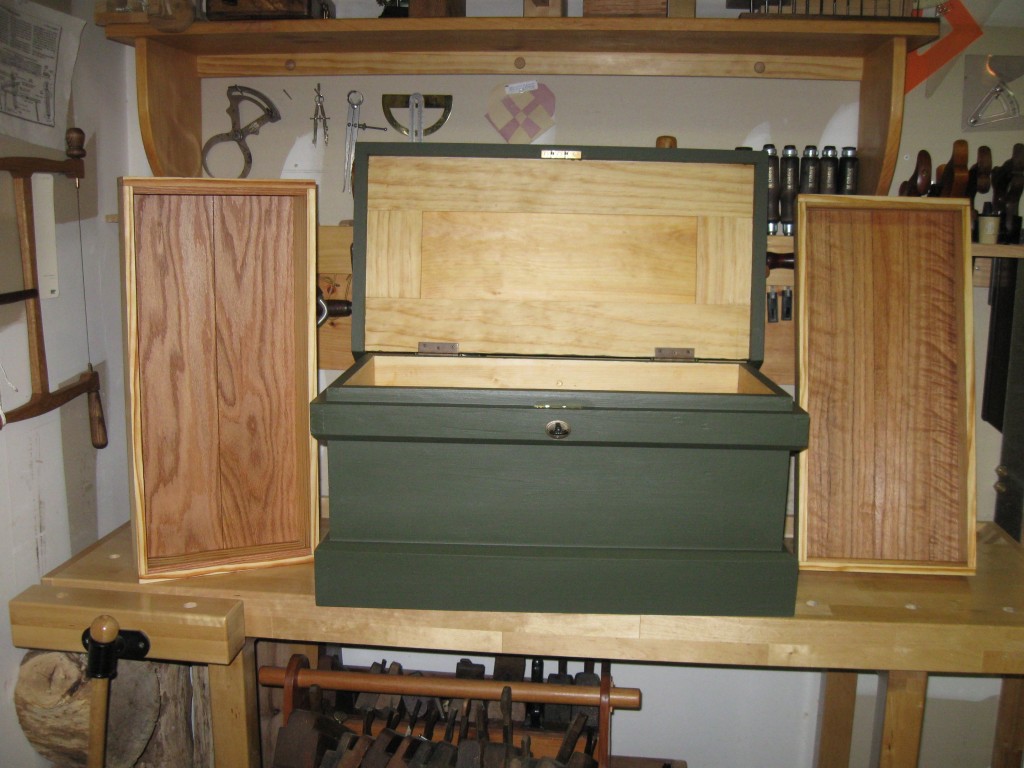
I decided on a smaller chest to hone my dovetail skills, a travel chest that is roughly 1/2 the size of the larger one.  The intended dimensions were 12x12x24, this is not exactly the golden ratio, but I sized the width to accommodate my largest plane, a 22″ Jointer.  This smaller footprint was constructed almost exactly to the same design as the full size ATC with a few exceptions:

1) Stock Thickness.  If I went with all dimensions reduced to 1/2, the stock thickness would be 1/2″ and I thought that was a little thin so I decided to go to 3/4″

2) Instead of sliding trays, I decided to maximize the storage space and make 2 lift-out full width and depth trays.  One is  1 1/2″ high and the other 3″ high.  This allows me to get a lot more tools in the small chest.  The lift-out trays make convenient tool holders while working and makes cleanup after use very quick.

atc_chest_sm-02atc_chest_sm-03

3) The lock is placed on the dust skirt, not on the carcass proper.  This was done to accommodate the smaller lock that I used.  I choose to only screw the dust skirt to the carcass, though I did let a little squeeze-out remain from the skirts assembly to help with fixing it to the body of the chest.  It is not under a lot of strain, so I figured fastening it in this way was OK.  What this allows:  If the lock ever breaks, I can remove the dust skirt and fix or replace it.

4) No bottom skids.  I decided to leave these off because this chest will spend most of its life (with me at least) on a cabinet at a good usable height to access the planes in the bottom and not on a wet or damp floor. I may at some point add thin skids but right now it will stay skidless.

This “prototype” exceeded my wildest expectations.  I am very pleased with the end product.  This will make a very good temporary home to my tools until the full sized one is built and also, be a great traveling chest, when taking classes and such.

A Trip to the Store

One of my favorite places for purchasing old tools is located right here in central North Carolina.  The store’s name is “Antique Woodworking Tools” and is run by Ed Lebetkin.  Ed is very knowledgeable and  very friendly. He has a huge array of hand tools in stock.  His store is located above Roy Underhill’s Woodwright School and if you sign up to his mailing list he will send you his store schedule.  So if you are ever in Chatham County N. C. near Pittsboro, do yourself  a favor and stop by his store and you too may leave with some new “olde” toys.  Also, Ed does buy as well as sell, so if you have tools you do not need, or want to offer up for store credit, make sure you bring them along as well.

Here is Ed’s Contact Information:

Antique Woodworking Tools
Ed Lebetkin
edlebetkin@gmail.com
919-967-1757

89A Hillsboro St
Pittsboro, NC

Thanks to Chris Schwarz for this video of Ed’s store


Lots of changes

If you are early to this site please excuse the number of changes going on as I learn how to use the tools for publishing this blog.  At least I got the e-mail subscriptions working if you would like to follow my updates via email.

– Aaron Henderson

No Time Like the Present

My current garage shop

My wife is awesome!  She is the reason I am making this blog entry today.  She has given me the inspiration, the time and most of all the encouragement to pursue my passion for woodworking.  She has agreed to let me move my workshop from my garage to our office inside the house.  This new location has a lot of advantages over my current setup.

First, it has natural light provided by two large east-facing windows, not southern as the optimum, but a great improvement over my florescent light I use in my current garage workshop.

Second, it will be a more comfortable location because my garage is not heated or cooled.  The lack of heating is not as big of  an advantage as the cooling,  the summers here in North Carolina are hot and humid and that is a very challenging environment for hand woodworking.

Third,  it is a clean slate and I can design the new space specifically to meet my woodworking needs.  My current space is pretty much a random grouping of items I have thrown together to make a workshop.  I have learned a bit about how I work and where I like to position my tools and furnishings for optimal efficiency.

The last advantage is that I am planning to install a hardwood floor to help my back while spending joyful hours standing at my workbench.

Come on and join me in this new adventure and watch my new space take shape.  Well,  I better get started, there’s no time like the present 🙂

Aaron