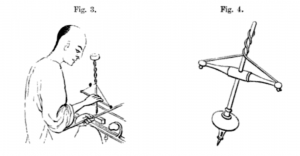
There are times in-between the major projects that I do small side projects just to see if I can get something cool to work. One of my interests is primitive fire starting techniques. There is some good overlap with this interest and my traditional woodworking. Well, a Pump Drill is definitely a project that has both aspects. It can be used as a drill or a fire starting tool.
First the fire starting. It is not certain if the Iroquois invented this for fire starting or were culturally contaminated by seeing the pump drill used by the settlers from the Old World. Either way, it is a very effective fire starter if built right. I have not used mine for lighting fires yet, as I have not built a proper chuck to house either a drill bit or a piece of fire drill stick. If you are interested in the fire starting aspects of this tool I am providing below a few links that will give you more information.
Primitive Pump Drill fire starter
Field and Stream Pump Fire Drill
As this is a woodworking blog, I will concentrate on the boring aspects of this tool. There is really very little information on when this tools was invented, but it is known to have been used as far back as middle ages and evolved from the bow drill.
I have seen this drill used in a few videos and decided to make one of my own. I had the basic components on hand a 7/8″ dowel, a nice heavy piece of hickory, a scrap of walnut and some leather thong strapping from my recent leather work.
Construction
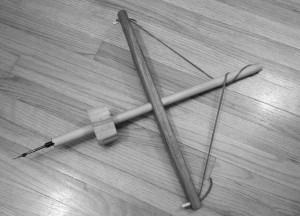
1) Make the flywheel from the hickory. This took the most time. As my lathe is not built yet, I had to resort to, shall we say, more crude techniques for making a round disk out of a really, really hard piece of wood. I made the disk about 1 1/2″ thick and 3″ in diameter. I could have made it a bit wider, but a too large flywheel will block your view of what you are drilling. I then drilled a 7/8″ hole in the center as true to 90 deg. as I could.
2) Make the shaft. Well I already had the dowel and so I just cut it to length at about 18″ and put it through the hole in the flywheel about 4″ from the bottom tip. I drilled a 1/4″ hole thru the flywheel into the shaft and drove a 1/4 dowel in to secure the flywheel (no glue needed). Then drill a 1/4″ hole in the top end of the shaft for the strapping. I also, very carefully, drilled a 1/4″ hole in center of the tip of shaft.
3) Make the pump stick. Drill a 7/8″ hole in the center of my walnut scrap that was about 18″X2″X7/8″. Then drill a 1/4″ hole for the strapping in each end about 3/4″ from the ends. To finish I tapered the ends on the shaving horse with my draw knife and spokeshave and beveled the sharp edges with my new LN block plane.
Assembly
This could not be easier, I added some bees wax to the shaft where the pump stick would be sliding up and down. Then slide the pump stick on the shaft and then attach the leather strapping thru the hole in the tip and secure with a small wedge. Next pass the strap through the top hole in the shaft and then back to the other end of the pump stick and secure in the same manner as the other side. You should adjust the pump stick to hang about 1″ – 1 1/2″ from touching the flywheel.
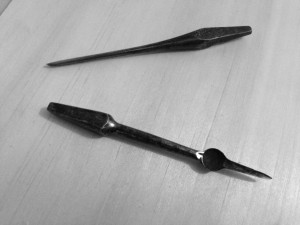
In the video below, you will see that for demonstration purposes, I added one of my spring pole lathe centers to the tip on the shaft so that it would spin when I pumped it. I did make a trip to ED Lebetkin’s awesome tool store and purchased two drill “spoon” type bits that work really well in these types of drills. Ordinary twist bits will only cut on half of the strokes and are not very efficient. These spoon bits cut on every stroke as they have a cutting edge on each side.
Next Steps: Make a chuck for the square tapered bits and one for the fire starting too.
One final note; once my lathe is finished, I want to make a really nice version of this drill with a polished stone flywheel and turned components in a couple of different sizes.
-Aaron


