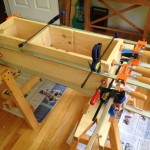
This was a very productive week with my Saw Box. I finished the main carcass of the box; I tuned and fit the dovetails, glued it up and attached the bottom board…twice (more on that later). I ordered and received my hasp from Lee-Valley tools. This is a big chunk of brass, and it will look great on my saw box. I still need to order the hinges and handles from Horton Brasses.
My one setback was that I had to redo the bottom board. I nailed the old one in place but I did not like the look and fit. I had rabbited the four sides to fit up in the box. My Lee-Valley moving fillister plane was set correctly, but I evidently did not tighten the depth- stop adequately. When I was planing away, I made my second mistake; I did not check the depth with my Starrett 6 inch combination square and I ended up with a 1/2″ deep rabbit, where I had set the depth for 3/8.” I also set the width of the rabbit too wide, so when I put the bottom board in the box there was about a 1/8″ to 3/16″ gap all the way around the inside bottom.
I have a mantra: “If I settle for good enough then my skills will never progress.” I decided to replace the bottom. This meant that I had to take the old bottom out and remove the cut nails. I have to say, the cut nails hold very well. It was quite hard to remove the nails from soft pine. This is good news, as I have used these for my projects extensively, and I am glad to report that they live up to their reputation. The nippers I acquired, upon the recommendation of the ATC tool list, worked very well to remove them. I straightened the bent nails and used them again for the new bottom board. This is in keeping with tradition where nails were so valuable that they were often recycled.
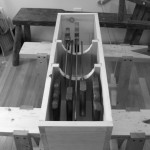
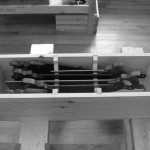
In my previous post I showed pictures of the till before it was completely cut out. I have now cut it out and it fits nicely in the dados I have put in the side boards before the assembly.
Here are some pics of the Saw Box at this stage.